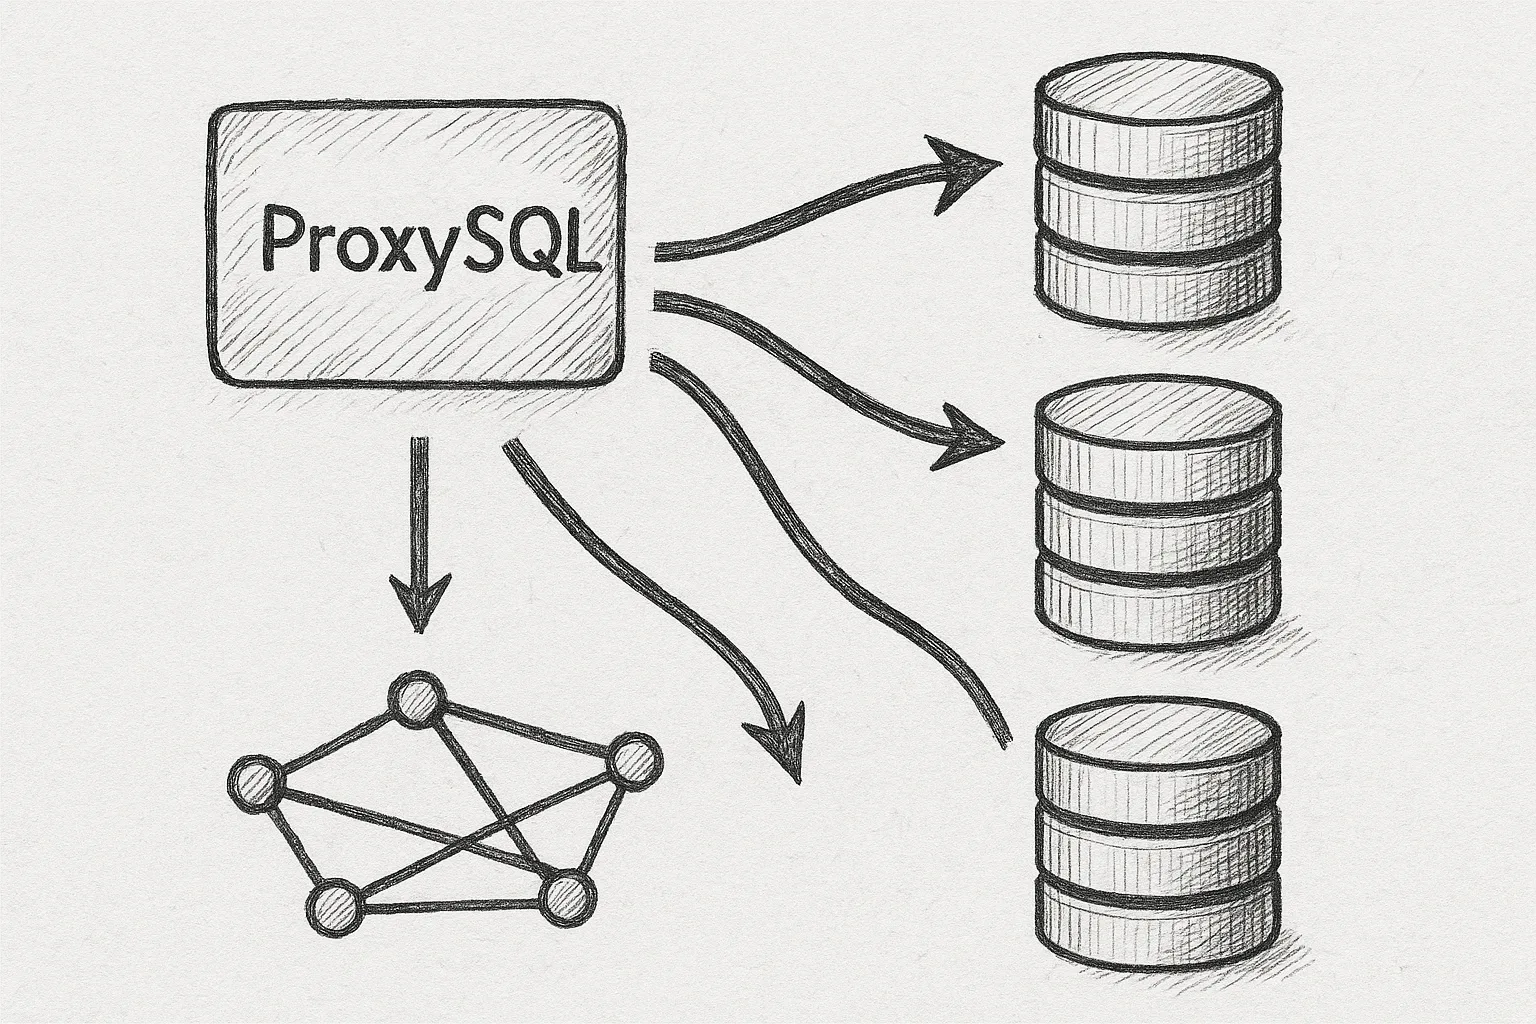
MySQL InnoDB Cluster gives you a native, synchronous HA cluster using Group Replication. ProxySQL sits in front of the cluster and handles connection pooling, failover-aware routing, and read/write splitting. Together they form a robust, application-friendly database layer.
Architecture overview
A typical production layout looks like this:
Clients
  │
  │  (MySQL protocol)
  ▼
┌──────────────────────┐
│      ProxySQL        │
│  - connection pool   │
│  - query rules       │
│  - failover routing  │
└─────────┬────────────┘
          │
          │ (backend MySQL)
          ▼
┌───────────────────────────────┐
│       InnoDB Cluster          │
│  ┌────────┬────────┬────────┐ │
│  │  R/W   │  R/O   │  R/O   │ │
│  │ node1  │ node2  │ node3  │ │
│  └────────┴────────┴────────┘ │
└───────────────────────────────┘
Key ideas:
- Applications connect only to ProxySQL, never directly to cluster nodes.
- ProxySQL knows which node is primary (read/write) and which are secondaries (read-only).
- ProxySQL can transparently reroute traffic when the primary changes.
Prerequisites and assumptions
This article assumes:
- You already have an InnoDB Cluster (3+ nodes) running on RHEL/Rocky Linux.
- Group Replication is healthy and you can connect as a DBA user.
- Basic familiarity with the MySQL Shell
dbaAPI and ProxySQL concepts.
Examples assume:
- Cluster nodes:
db1,db2,db3(all port 3306). - ProxySQL host:
proxy1. - Application user:
appuser.
Step 1: Install ProxySQL on RHEL/Rocky Linux
Install ProxySQL from the official repository or a trusted package source. Example using a generic RPM:
sudo yum install -y proxysql

sudo systemctl enable proxysql
sudo systemctl start proxysql

# Verify it is listening on port 6033 (frontend) and 6032 (admin)
ss -lntp | grep 603
Default ports (unless customised):
- 6033: MySQL client port (applications connect here).
- 6032: Admin port (you manage ProxySQL here with a MySQL client).
Step 2: Create dedicated MySQL users for ProxySQL
Create two users in the InnoDB Cluster:
- monitor user for ProxySQL health checks.
- application user for real traffic (already used by apps, but we will configure it in ProxySQL).
On a cluster primary node:
CREATE USER 'proxysql_monitor'@'%' IDENTIFIED BY 'strong_monitor_pw';
GRANT USAGE, REPLICATION CLIENT ON *.*
  TO 'proxysql_monitor'@'%';

CREATE USER 'appuser'@'%' IDENTIFIED BY 'strong_app_pw';
GRANT SELECT, INSERT, UPDATE, DELETE, EXECUTE
  ON appdb.* TO 'appuser'@'%';

FLUSH PRIVILEGES;
Because this is InnoDB Cluster with Group Replication, these users will replicate to all nodes.
Step 3: Connect to ProxySQL admin interface
From proxy1 (or anywhere that can reach port 6032):
mysql -u admin -p -h 127.0.0.1 -P6032The default admin password is usually admin in lab environments; change it immediately in any real environment:
UPDATE global_variables
  SET variable_value = 'VeryStrongAdminPw'
  WHERE variable_name = 'admin-admin_credentials';

LOAD ADMIN VARIABLES TO RUNTIME;
SAVE ADMIN VARIABLES TO DISK;
Step 4: Register InnoDB Cluster nodes as backends
First, configure the monitor credentials ProxySQL will use to check node status:
UPDATE global_variables
  SET variable_value = 'proxysql_monitor:strong_monitor_pw'
  WHERE variable_name = 'mysql-monitor_username_password';

LOAD MYSQL VARIABLES TO RUNTIME;
SAVE MYSQL VARIABLES TO DISK;
Now add the three cluster nodes to mysql_servers. We will group them logically into two hostgroups:
10= writer (primary).20= readers (secondaries).
INSERT INTO mysql_servers (hostgroup_id, hostname, port, max_connections)
VALUES
  (10, 'db1', 3306, 2000),
  (20, 'db1', 3306, 2000),
  (20, 'db2', 3306, 2000),
  (20, 'db3', 3306, 2000);

LOAD MYSQL SERVERS TO RUNTIME;
SAVE MYSQL SERVERS TO DISK;
The primary appears in both hostgroups because it must serve writes and can optionally serve reads.
Step 5: Configure replication hostgroups (writer/reader split)
ProxySQL can automatically switch which node is treated as the writer based on replication state. For InnoDB Cluster, it is usually enough to track the Group Replication primary.
Define a replication hostgroup pair:
INSERT INTO mysql_replication_hostgroups
  (writer_hostgroup, reader_hostgroup, comment)
VALUES
  (10, 20, 'InnoDB Cluster R/W split');

LOAD MYSQL SERVERS TO RUNTIME;
SAVE MYSQL SERVERS TO DISK;
Next, enable native Group Replication monitoring so ProxySQL can identify the primary. This relies on performance_schema.replication_group_members and replication_group_member_stats.
UPDATE global_variables
  SET variable_value = 1
  WHERE variable_name = 'mysql-monitor_groupreplication_healthcheck';

LOAD MYSQL VARIABLES TO RUNTIME;
SAVE MYSQL VARIABLES TO DISK;
After a minute, check how ProxySQL classifies nodes:
SELECT hostgroup_id, hostname, port, status, weight
FROM runtime_mysql_servers
ORDER BY hostgroup_id, hostname;
You should see one node active in hostgroup 10 (writer) and all healthy nodes in hostgroup 20 (readers).
Step 6: Configure users and connection routing
Add the application user to ProxySQL and map it to the writer hostgroup by default:
INSERT INTO mysql_users
  (username, password, default_hostgroup, transaction_persistent)
VALUES
  ('appuser', 'strong_app_pw', 10, 1);

LOAD MYSQL USERS TO RUNTIME;
SAVE MYSQL USERS TO DISK;
transaction_persistent = 1 ensures that all statements in a transaction stay on the same backend.
At this point, a simple connection test should work:
mysql -u appuser -p -h proxy1 -P6033 -D appdb

SELECT @@hostname, @@read_only;
You should land on the current primary with @@read_only = 0.
Step 7: Add basic read/write splitting
Many deployments want reads to go to secondaries and writes to the primary. You can implement this with ProxySQL query rules.
Simple pattern (non-transactional reads only):
- Default hostgroup for
appuseris writer (10). - Match
SELECTqueries and route them to reader hostgroup (20) when safe.
Create a basic rule:
INSERT INTO mysql_query_rules
  (rule_id, active, username, match_pattern, destination_hostgroup,
   apply, flagIN, flagOUT)
VALUES
  (10, 1, 'appuser', '^SELECT', 20, 1, 0, 0);

LOAD MYSQL QUERY RULES TO RUNTIME;
SAVE MYSQL QUERY RULES TO DISK;
Now test:
mysql -u appuser -p -h proxy1 -P6033 -D appdb

SELECT @@hostname, @@read_only;        -- likely a reader (read_only = 1)

BEGIN;
SELECT @@hostname, @@read_only;        -- stays on writer if you refine rules
COMMIT;
Important: Real-world read/write splitting rules should be more conservative. For example, you might avoid routing:
- SELECTs inside explicit transactions.
- SELECTs that call non-deterministic functions or use temporary tables.
Use additional rule conditions (e.g. flagIN, schemaname) to refine behaviour.
Step 8: Tuning health checks and timeouts
ProxySQL periodically checks backend health and replication role. For InnoDB Cluster, you want:
- Fast detection of primary changes.
- Reasonable tolerance for transient network glitches.
Examples:
-- Check interval for Group Replication health (ms)
UPDATE global_variables
  SET variable_value = 1000
  WHERE variable_name = 'mysql-monitor_groupreplication_interval';

-- Backend connect timeout (ms)
UPDATE global_variables
  SET variable_value = 2000
  WHERE variable_name = 'mysql-connect_timeout_server';

LOAD MYSQL VARIABLES TO RUNTIME;
SAVE MYSQL VARIABLES TO DISK;
Monitor status regularly:
SELECT * FROM runtime_mysql_servers ORDER BY hostgroup_id, hostname;
SELECT * FROM monitor.mysql_server_groupreplication_log ORDER BY time_start DESC LIMIT 10;
Step 9: Handling failover in InnoDB Cluster
When the primary fails, InnoDB Cluster elects a new primary. ProxySQL should:
- Detect the new primary via Group Replication metadata.
- Move it into the writer hostgroup.
- Mark the old primary as offline.
ProxySQL does this automatically when mysql-monitor_groupreplication_healthcheck is enabled. To see it in action:
- Stop MySQL on the current primary (in a lab only):
sudo systemctl stop mysqld - Watch ProxySQL status:
SELECT hostgroup_id, hostname, status FROM runtime_mysql_servers ORDER BY hostgroup_id, hostname; - Run a simple app query through ProxySQL and confirm it hits the new primary.
Warning: Do not stop MySQL on a production primary without a clear failover plan, maintenance window, and rollback strategy.
Operational best practices
1. Keep ProxySQL highly available
ProxySQL itself can be a single point of failure. Use at least two instances with a virtual IP or load balancer in front:
Clients
  │
  ▼
┌───────────────┐
│   VIP / LB    │
└─────┬─────────┘
      │
  ┌───┴─────┐
  │         │
  ▼         ▼
ProxySQL1  ProxySQL2
      │         │
      └───┬─────┘
          ▼
    InnoDB Cluster
2. Version and config management
- Store ProxySQL configuration SQL in version control.
- Use
SAVE ... TO DISKafter every approved change. - Automate provisioning via configuration management (Ansible, etc.).
3. Observability
- Scrape ProxySQL stats (e.g.
stats_mysql_query_digest) into Prometheus or similar. - Alert on backend status changes and admin errors.
- Track query latency before and after introducing ProxySQL.
4. Security
- Restrict access to admin port 6032 using firewalld or security groups.
- Use strong, unique passwords for monitor and app users.
- Rotate credentials regularly and update ProxySQL accordingly.
Conclusion
ProxySQL in front of MySQL InnoDB Cluster gives you connection pooling, read/write splitting, and failover-aware routing without changing application code. By carefully modelling hostgroups, health checks, and query rules, you can build a resilient data tier that hides cluster complexity from clients while preserving InnoDB Cluster's strong consistency guarantees.
This article offers general technical guidance. Validate all configurations in a safe environment before applying them to production.
Leave a Reply